 Lather Up! Here’s How to Make Milk Soap at Home
Cleopatra was onto something. Not only was she known for her beautiful skin, but she achieved it by taking milk baths. We’re here to help you learn how to make milk soap at home so you can steal her ancient, yet foolproof, skincare secrets. That’s right! The cure to your dry, itchy skin is right in your fridge.
We know that drinking milk is good for the skin. Now, you can use milk to create DIY beauty products that can save you tons of money on skincare. Here is a basic recipe that you can use to create your own variation of homemade milk soap. It makes a great gift, too.
Whether you change the fragrance or add your own touch, you can create a useful skin solution that won’t break the bank or use dangerous chemicals.
Is Milk Really Good for Skin?
You bet!
Milk is good for more than you’d think. Did you know that you can help soothe a sunburn by dabbing milk on it? You can also exfoliate your skin with it and cure the itch of bug bites.
Whether you drink it or apply it to your skin, it works to make you look and feel healthy. That’s because milk contains tons of vitamins and nutrients that work on your skin to nourish and exfoliate it.
Among the list is vitamin D for a healthy glow, vitamin A for treating dry skin, vitamin B6 for new cell formation, biotin for cell growth and healthy skin, lactic acid for moisturization, calcium for youthful elasticity, and selenium for fighting anti-aging.
That’s why milk soap is a very popular and useful type of exfoliation that has been around for centuries.
If milk soap isn’t your thing, you can try tons of other ways to use milk for skin care. From the milk bath benefits to the soothing of an exfoliating mask, your next best skin care product is right in your fridge.
The Many Benefits of Milk Soap
Milk soap products are more gentle on the skin than regular soaps. That’s because the pH of milk soap is almost the same as the pH of human skin.
The vitamins and minerals already in your milk create the perfect milk soap recipe. That means that you get a naturally gentle clean without the need to add harsh chemicals or unnecessary additives.
Those who suffer from skin conditions such as eczema or psoriasis find that milk soaps are easier on their dry and itchy skin.
The natural ingredients in your glass of milk offer tons of exfoliation and moisturizing benefits, too.
The lactic acid in milk is actually the same kind of acid that cosmetic professionals use in their skin peels. It’s just a lower amount in milk. So you’re getting the benefits of a professional peel just from your milk.
That’s also why it’s easy to make milk soap at home. Since you don’t need to add a ton of chemicals, it’s easy to make your own milk soap recipe.
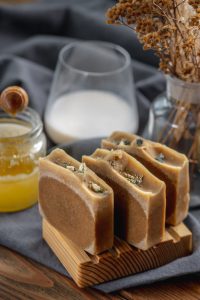
How to Make Milk Soap
There are tons of homemade milk soap recipes out there, and one click on Pinterest will bring them right to you.
Here is a basic recipe, courtesy of The Nerdy Farm Wife. Once you’ve got your basic recipe down, you can add your own variations, like scented essential oils, honey, or oatmeal.
Ingredients:
- 4.3 ounces of Lye (also known as sodium hydroxide for solid bars of soap and potassium hydroxide for liquid soap)
- 10 ounces of milk (any type- freeze before making the soap)
- 22 ounces of olive oil
- 8 ounces of coconut oil
- 1 ounce castor oil
You will also need a mold of your choice, as well as the right safety equipment, such as gloves.
The Process:
- Prepare your mold if necessary. For some types of molds, like bread pans, you’ll have to line them with parchment paper first.
- Take your frozen milk and weigh out how much you need if you didn’t already separate it before freezing.
- Sprinkle the lye into the milk, slowly, and a little bit at a time. It will begin to thaw the milk as you stir. Make sure you keep stirring constantly and slowly, and don’t rush.
- Combine your oils together, preferably in a heavy duty pot, and heat the coconut oil in a saucepan if necessary. Soap oils should generally be between 90 and 100 degrees fahrenheit.
- Slowly pour the lye and milk mixture into the oils. Blend with a stick blender, but alternate stirring with the motor on and off so the mixture doesn’t bubble. Do this until the mixture is thick enough to hold the line when you drizzle it on the surface.
- This is the step when you’d stir in your extras, like essential oils or honey.
- Pour your soap mixture into your mold.
- If you want whiter soap, place it in the fridge or freezer for 24 hours. Once you take it out, leave it at room temperature for 24 to 48 hours. If you want browner soap, leave it at room temperature for the first 24 hours.
- Unmold the soap, or slice it into bars if you used one big mold. Then, let it cure in open air for 4 to 6 weeks, rotating occasionally. Then, you’re all set to use it or gift it!
Sign up For Home Milk Delivery to Make Sure You’ve Always Got Fresh Milk Available
Milk is delicious and great for the body, both on the inside and the outside. To make sure you always have some fresh milk available, sign up for home milk delivery. When fresh milk is delivered right to your door regularly, you know you’ll always have some in the fridge. That means you’ll always have the ingredients on hand to make milk soap, whether you need it for a gift or for your own beauty routine. Home milk delivery benefits everyone, at all stages of the process. From the local dairy farmer to the happy customer, you’re supporting your community every step of the way. So there’s always something to feel good about.
Browse our database to find a local dairy near you and sign up for home milk delivery.